Circuit Playground
This guide shows how you can program the Adafruit Circuit Playground Bluefruit to function as a remote control for the Shared Game Timer. Also, how to power it from a LiPo battery to make it nice and portable.
Overview
The Shared Game Timer has a open-ended bluetooth module that allow you to write to and read from Bluetooth Low Energy (LE) devices. These can be things like LED lights, buttons etc. In this guide, we will program the Adafruit Circuit Playground Bluefruit board to be a really cool little remote control.
Adafruit is an awesome electronics company based in New York but they sell world-wide. Their mission is to make electronics approachable and fun, and so they created the Circuit Playground, a perfect board to start playing around with electronics. It has 10 LEDs, two buttons, a switch, a little speaker and an accelerometer, all of which we will make use of in this guide!
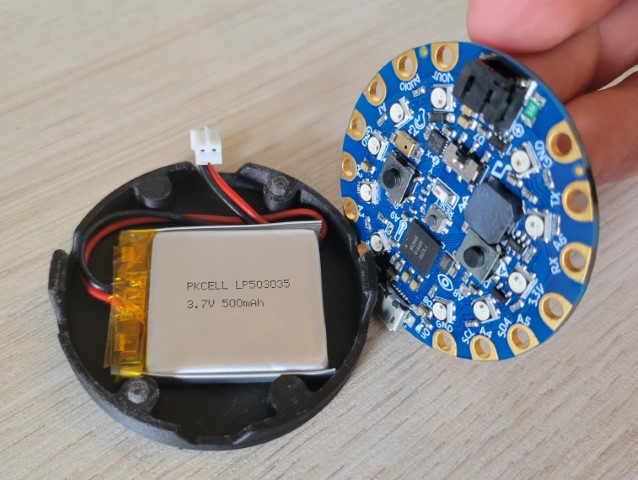
You can power the board from a standard USB power pack, but to make this remote control easier to pass around a board game table, I will also show how I 3D printed a small enclosure to hold the board and a small LiPo battery.
Components
The main component is of course the Circuit Playground Bluefruit board, and, if you will power it via USB, that is all you need. (and a USB power pack and a USB micro cable of course)
But, if you want to go portable, also get the thin LiPo battery and a charger.
 Adafruit Circuit Playground Bluefruit
 Lithium Ion Polymer Battery - 3.7v 500mAh
 Charger for LiPoly Batteries
The Battery Holder
To make the board easy to pass around the gaming table, you want the battery and the board to be one unit.
You could go the McGyver route and simply tape them together with electrical tape... But, for a more graceful solution, 3D print this battery enclosure.
Assuming you don't have a 3D printer, maybe you can find one at your school, university or there may be a local company that allow you to print items? Failing that, there are many online companies that will happily print and send you items.
Here is the full guide to the Circuit Playground mount.
Note that the two mounting pegs were slightly too thick when I got my 3D printed mount, but it was easy to fix by sandpapering them down ever so slightly.
Programming the Circuit Playground
We will be programming the Circuit Playground using Circuit Python. There is a bit of setup to make this all work. I will assume that you know nothing about programming, and that your board is brand new.
- Install Circuit Python on your board by following this setup guide page. You should now have a disk drive called
CIRCUITPY. - Follow this guide to install some basic software libraries. Take all the libraries that the guide tells you to install, but you will also need a few extra. In the end, you should have these installed under
/lib: adafruit_ble, adafruit_circuitplayground, adafruit_led_animation, neopixel.mpy, adafruit_lis3dh.mpy. If you struggle at this stage, check out this page for more details about installing libraries. - Download the Game Timer's Circuit Playground's code.py file and copy it to the
CIRCUITPYdrive, overwriting the existing file. (safe-copy it if you like) - The top of the
code.pyfile has some variables that you can edit to customize how the remote works. You will find them between the comments saying '# Constants and Setup' and 'END OF THINGS YOU SHOULD MESS WITH'. Go ahead and play around with the variables. You can probably do this editing in any text editor, but I recommend you install the Mu Editor. See these pages for help on editing code: Installing the Mu Editor, Creating and Editing Code, Connecting to the Serial Console (if you want to see debug/error messages)
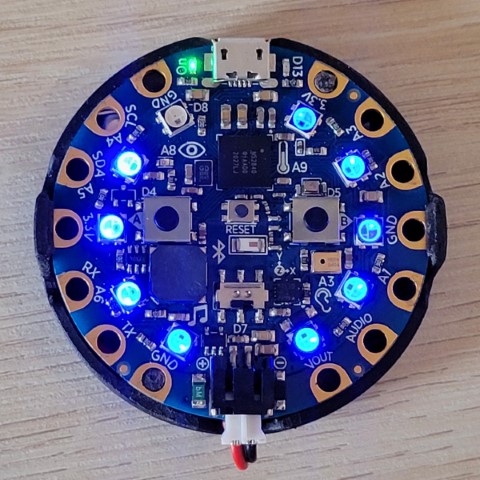
If you did all of the above, you should see a blue rotational animation of the ten LEDs, meaning it is ready to be connected to via Bluetooth.
Connecting it to the Shared Game Timer
The Shared Game Timer Bluetooth connectivity is quite open-ended, able to connect to many different devices. This flexibility also means that the process of setting it up can be a bit confusing, but this step-by-step guide should hopefully help, and if you struggle, feel free to email me and I will be happy to assist.
Go to any Shared Game Timer game (feel free to create a toy one just to try it out), open the menu, open the Remote Control menu and click into the Bluetooth LE page.
Click the Device Configuration link.
If you have not yet added the Nordic UART service, click the 'Add Nordic UART' button.
You should now see the Service in the list of services. Click the button and you should be asked to connect to the Bluetooth device. Assuming the playground is still blinking blue, you should see it available named something like 'Circuit Playground' or 'CIRCUITPY'. Click it and then Pair.
You should now see two sections, Write Script and Action Mapping. For more information about these sections, see the the Bluetooth Remote Control Overview page for more details.
The Shared Game Timer can ask the device for its preferred Write Script and Action Mapping by clicking the 'Request Setup Suggestion' button. This should populate the two sections. You should leave the Write Script as is, as sending the wrong commands will not work. The Actions Mapping, however, is only a suggestion, and you are free to edit it as you see fit. Remember to hit the 'Save' buttons on both sections.
The suggested 'Write Script' should be this:
0 sgtTimerMode;sgtState;sgtColor;sgtTurnTime;sgtPlayerTime%0A
What it basically says is, "0 milliseconds after triggering, send the current game state, color and current turn time, followed by the new line character. For example, it might send cu;pl;ff0033;150;300 . Give it a name and hit Save.
Now look at the Action Mapping section. In the 'Log' you will see all the events sent from the Clue to the Shared Game Timer. Try pressing the left A button. You should see 'Button A' appear. Try pressing both A and B. You should see 'Button AB'.
Now it is up to you to decide which events should correspond to which actions in the Shared Game Timer.
The following table shows all the things the Clue can do.
| Event | Description |
|---|---|
| Button A | Left button |
| Button B | Right button |
| Button AB | Both buttons |
| Switch ON/OFF | Moving the switch to ON or the OFF position. |
| Connect | Automatic at connection |
| To/From orientation | Turn the Playground to or away from a certain orientation. |
| Shake | When shaking the Playground. |
| orientation can be Face Down or Face Up | |
The Orientation feature can end up sending a lot of data over bluetooth. Edit the code.py file to deactivate orientations you do not need. | |
When defining keywords for your action map, remember that the Shared Game Timer will evaluate each of the action mappings in order and trigger the first one that contains the keyword.
So the keyword 'Switch' will match both 'Switch ON' and 'Switch OFF'.
This is also why we must put 'Button AB' above 'Button A'. As a rule, the most expressive keywords should go at the top.
We are now all done to use the remote! Go back to the Bluetooth Remote page, and you should see the Write Script and Activation Map we just created. Activate both. For the Write Script, click the 'Tick all checkboxes' button, and also tick the 'Whenever target state becomes active' as well as 'When Polled'. Finally, click Connect and you are now DONE! 🥳